How to Create a Folder Monitoring Program Using clamdscan on macOS
This memorandum describes how to create a small folder monitoring program using clamdscan.
The program consists of the following seven components:
2) ClamavSentry: Shell Script
3) SentryAlert.scpt: AppleScript
3-1) When using the "display notification" command...
3-2) When using the "display dialog" command...
4) org.clamav.sentry.plist: LaunchAgents plist
5) SwiftBar: An application that puts the output in the menu bar
6) com.SwiftBar.plist: LaunchAgents plist
7) ClamavSentry.10m.sh: SwiftBar plugin
For instructions on how to build ClamAV, please refer to "How to build ClamAV® using the CMake Build System on macOS".
And Links…
1) fswatch
fswatch is a file change monitor that receives notifications when the contents of the specified files or directories are modified.
1. Download the latest fswatch
cd ~
curl -LO https://github.com/emcrisostomo/fswatch/releases/download/1.22.0/fswatch-1.22.0.tar.gz
tar xzf fswatch-1.22.0.tar.gz
2. Configure fswatch
cd fswatch-1.22.0
./configure --prefix=/usr/local/fswatch --host=aarch64-apple-darwin`uname -r`
3. Compile and make check
make && make check
"make check" will end up with as below:
============================================================================
Testsuite summary for fswatch 1.22.0
============================================================================
# TOTAL: 10
# PASS:  10
# SKIP:  0
# XFAIL: 0
# FAIL:  0
# XPASS: 0
# ERROR: 0
============================================================================
4. Make and install fswatch
sudo make install
5. Set search path
export PATH="/usr/local/fswatch/bin:$PATH"
6. Verify fswatch installed properly
which fswatch
/usr/local/fswatch/bin/fswatch

fswatch --version
fswatch 1.22.0
Copyright (C) 2013-2025 Enrico M. Crisostomo.
License GPLv3+: GNU GPL version 3 or later.
2) ClamavSentry
ClamavSentry is a Shell Script that performs the following actions:
・Monitors the specified folders using fswatch that is a file change monitor.
・Notifies clamdscan whenever new files are created.
・If clamdscan detects any viruses, it will notify SentryAlert.scpt and sound an alert.
1. Create ClamavSentry
#!/usr/bin/env bash
#
# Description: Monitors the specified folder and passes detected changes to clamdscan.
#              If a virus is detected, it notifies SentryAlert.scpt and sounds an alert.
# Name       : ClamavSentry

# Path to fswatch
FSWATCH="/usr/local/fswatch/bin/fswatch"

# Path to clamdscan
CLAMDSCAN="/usr/local/clamXav/bin/clamdscan"

# Path to SentryAlert.scpt
APPLE_SCRIPT="$HOME/Library/ClamAV/ClamdScan/SentryAlert.scpt"

# Path to log file
LOG_FILE="$HOME/Library/Logs/ClamdScan.log"

# Path to audio file
AUDIO_FILE="$HOME/Library/ClamAV/ClamdScan/alert.aiff"

# Path to Watch directory
WATCH_DIRS=(
  "/Volumes/Data/Downloads/"
  "$HOME/Library/Mail/"
  "$HOME/Library/Mail Downloads/"
)

"$FSWATCH" --event IsFile Created -0 -r "${WATCH_DIRS[@]}" | while IFS= read -r -d '' changed_path; do
  scan_output="$("$CLAMDSCAN" --stdout --infected --no-summary -- "$changed_path" 2>&1 || true)"
  found_lines="$(printf '%s\n' "$scan_output" | grep 'FOUND' || true)"

  if [ -n "$found_lines" ]; then
    /usr/bin/osascript "$APPLE_SCRIPT" "$found_lines" "$LOG_FILE" & /usr/bin/afplay "$AUDIO_FILE"
  fi
done
2. Grant execute permission to ClamavSentry
chmod +x ClamavSentry
3. Place ClamavSentry in $HOME/Library/ClamAV/
$HOME/Library/ClamAV/ClamavSentry
3) SentryAlert.scpt
SentryAlert.scpt is an AppleScript that displays "Notification Alert" or "Dialog Alert" and logs the event.
3-1) When using the "display notification" command...
1. Create SentryAlert.scpt
on run argv
    if (count of argv) < 2 then return

    set foundText to item 1 of argv
    set logFilePath to item 2 of argv

    set msg to "Infection Found:" & linefeed & foundText
    display notification msg with title "ClamAV Alert !"

    set ts to do shell script "date '+%Y-%m-%d %H:%M:%S'"
    set logBlock to "-------------------------------------- SCAN LOG --------------------------------------" & linefeed & ts & linefeed & msg & linefeed & "--------------------------------------------------------------------------------------" & linefeed & linefeed

    do shell script "printf %s " & quoted form of logBlock & " >> " & quoted form of logFilePath
end run
2. Grant execute permission to SentryAlert.scpt
chmod +x SentryAlert.scpt
3. Place SentryAlert.scpt in $HOME/Library/ClamAV/ClamdScan/
$HOME/Library/ClamAV/ClamdScan/SentryAlert.scpt
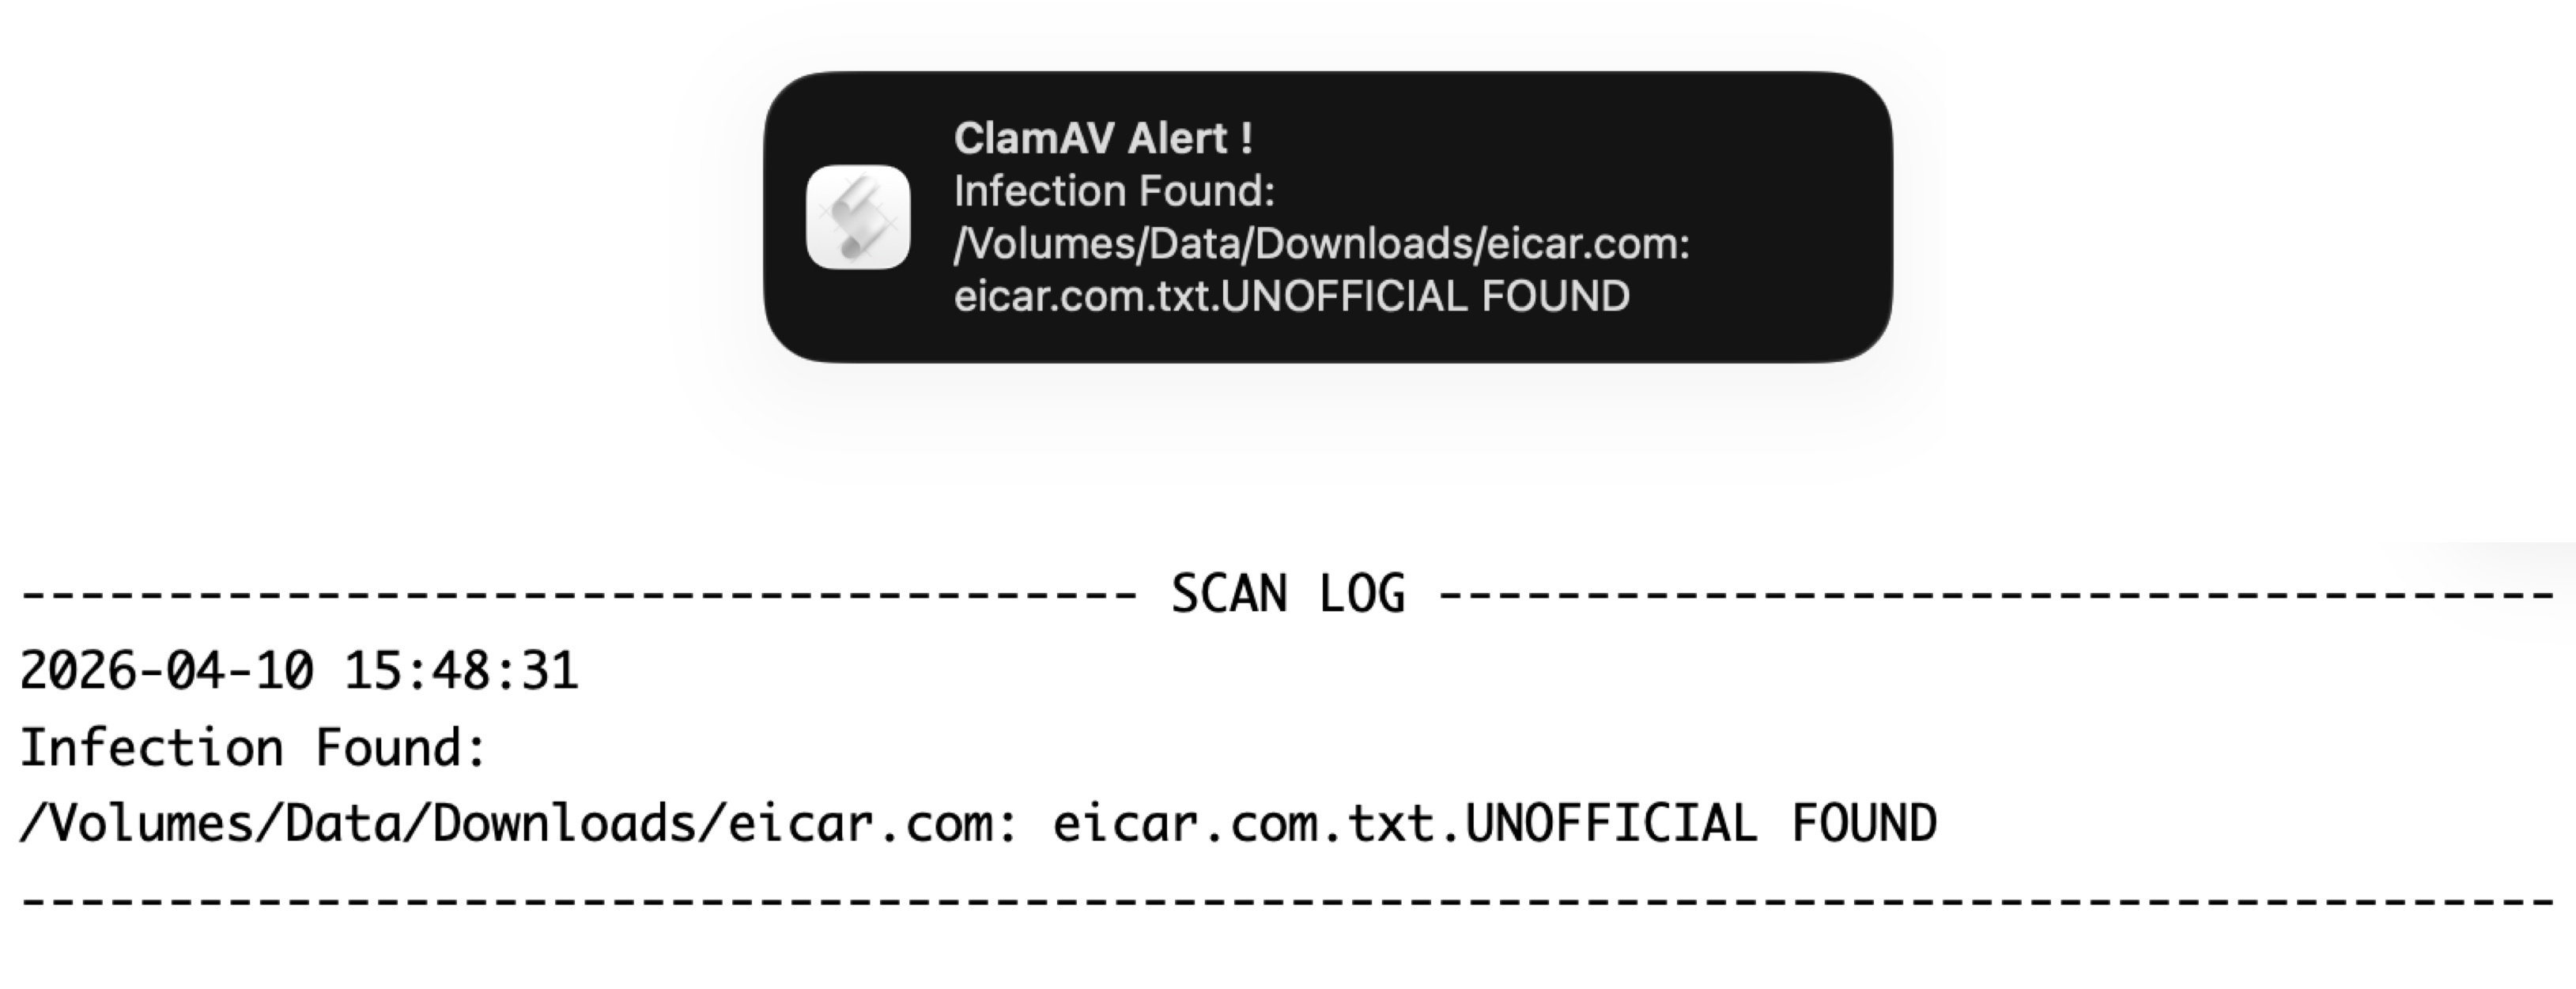
4. The following "Notification Aleart" will appear with a warning sound and you will get "ClamdScan.log" as below.
"Notification Aleart" and "ClamdScan.log"
3-2) When using the "display dialog" command...
1. Create SentryAlert.scpt using "display dialog"
on run argv
    if (count of argv) < 2 then return

    set foundText to item 1 of argv
    set logFilePath to item 2 of argv

    set msg to "Infection Found:" & linefeed & foundText
    set iconPath to POSIX file "/Users/xxx/Library/ClamAV/ClamdScan/alert.png"

    display dialog msg with title "                                            ClamAV Alert !" with icon file iconPath buttons "OK" default button "OK"

    set ts to do shell script "date '+%Y-%m-%d %H:%M:%S'"
    set logBlock to "-------------------------------------- SCAN LOG --------------------------------------" & linefeed & ts & linefeed & msg & linefeed & "--------------------------------------------------------------------------------------" & linefeed & linefeed

    do shell script "printf %s " & quoted form of logBlock & " >> " & quoted form of logFilePath

    set savedDelimiters to AppleScript's text item delimiters
    set AppleScript's text item delimiters to "/"
    set parts to text items of foundText

    set folderParts to items 1 thru -2 of parts
    set AppleScript's text item delimiters to "/"
    set folderPath to folderParts as text
    set folderPath to folderPath & "/"

    set AppleScript's text item delimiters to savedDelimiters

    tell application "Finder"
        open folderPath as POSIX file
        activate
    end tell
end run
2. Grant execute permission to SentryAlert.scpt
chmod +x SentryAlert.scpt
3. Place SentryAlert.scpt in $HOME/Library/ClamAV/ClamdScan/
$HOME/Library/ClamAV/ClamdScan/SentryAlert.scpt
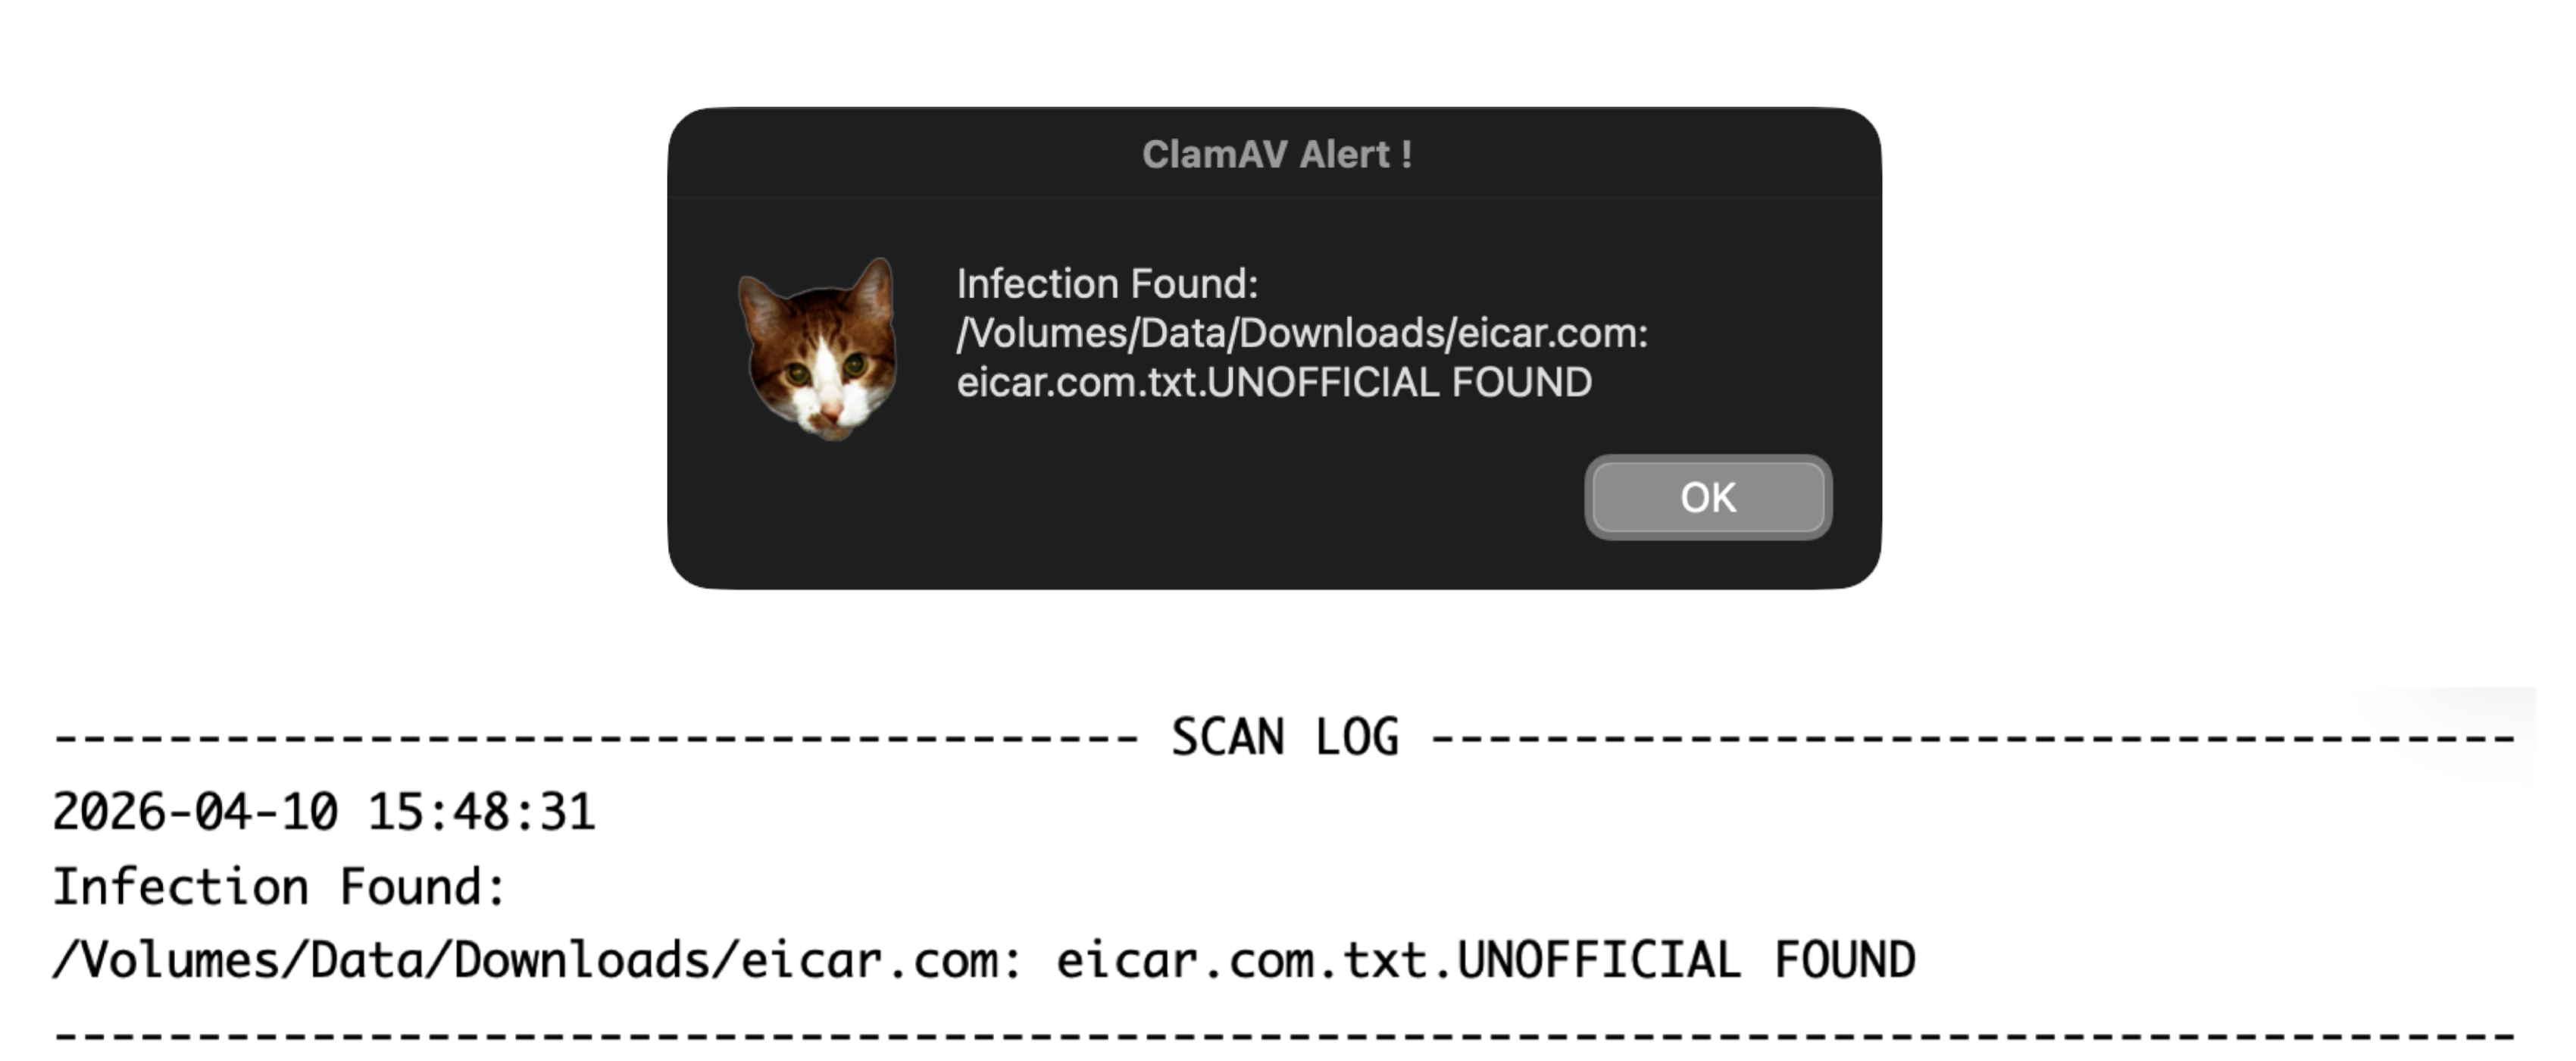
4. The following "Dialog" will appear with a warning sound and you will get "ClamdScan.log" as below.
Clicking the "OK" button will open a Finder window displaying the directory containing the infected files.
"Dialog" and "ClamdScan.log"
4) org.clamav.sentry.plist
org.clamav.sentry.plist is a plist file for LaunchAgents that launches ClamavSentry using launchctl at login.
1. Create org.clamav.sentry.plist
<?xml version="1.0" encoding="UTF-8"?>
<!DOCTYPE plist PUBLIC "-//Apple//DTD PLIST 1.0//EN" "http://www.apple.com/DTDs/PropertyList-1.0.dtd">
<plist version="1.0">
<dict>
    <key>Label</key>
    <string>org.clamav.sentry</string>
    <key>RunAtLoad<key>
    <true/>
    <key>KeepAlive</key>
    <dict>
        <key>PathState</key>
        <dict>
        <key>/private/tmp/clamd.socket</key>
        <true/>
        </dict>
    </dict>
    <key>ProgramArguments</key>
    <array>
        <string>/Users/xxx/Library/ClamAV/ClamavSentry</string>
    </array>
</dict>
</plist>
2. Place org.clamav.sentry.plist in $HOME/Library/LaunchAgents/
$HOME/LaunchAgents/org.clamav.sentry.plist
5) SwiftBar
SwiftBar is an application that puts the output in the menu bar.
1. Download the latest SwiftBar
Notes:
The current latest version of SwiftBar is v2.1.2-beta-5, but there seems to be a bug where the menu bar displays a ⚠️ error icon when the computer wakes from sleep, even though the plugin appears to be loading correctly.
For this reason, I'm using the SwiftBar v2.0.1.
2. Place SwiftBar.app in /Applications/Utilities/
The current latest version of SwiftBar is v2.1.2-beta-5, but there seems to be a bug where the menu bar displays a ⚠️ error icon when the computer wakes from sleep, even though the plugin appears to be loading correctly.
For this reason, I'm using the SwiftBar v2.0.1.
cd
curl -LO https://github.com/swiftbar/SwiftBar/releases/download/v2.0.1/SwiftBar.v2.0.1.b536.zip
unzip SwiftBar.v2.0.1.b536.zip -x "__MACOSX/*"
2. Place SwiftBar.app in /Applications/Utilities/
mv SwiftBar.app /Applications/Utilities/
6) com.SwiftBar.plist
com.SwiftBar.plist is a plist file for LaunchAgents that launches SwiftBar using launchctl at login.
1. Create com.SwiftBar.plist
<?xml version="1.0" encoding="UTF-8"?>
<!DOCTYPE plist PUBLIC "-//Apple//DTD PLIST 1.0//EN" "http://www.apple.com/DTDs/PropertyList-1.0.dtd">
<plist version="1.0">
<dict>
    <key>Label</key>
    <string>com.SwiftBar</string>
    <key>RunAtLoad<key>
    <true/>
    <key>KeepAlive</key>
    <true/>
    <key>ProgramArguments</key>
    <array>
        <string>/Applications/Utilities/SwiftBar.app/Contents/MacOS/SwiftBar</string>
    </array>
</dict>
</plist>
2. Place com.SwiftBar.plist in $HOME/Library/LaunchAgents/
$HOME/LaunchAgents/com.SwiftBar.plist
7) ClamavSentry.10m.sh
ClamavSentry.10m.sh is a SwiftBar plugin that displays the processes of ClamavSentry in the menu bar using SwiftBar.
1. Create ClamavSentry.10m.sh
#!/usr/bin/env bash

# <xbar.title>ClamavSentry Monitor</xbar.title>
# <xbar.version>v1.0</xbar.version>
# <xbar.desc>Monitor the processes of ClamavSentry and display them in the menu bar.</xbar.desc>
# <swiftbar.refreshOnOpen>true</swiftbar.refreshOnOpen>

PROCESS_NAME="ClamavSentry"
FONT_SIZE=18
FONT_COLOR_ALIVE="#e4e4e4"
FONT_COLOR_DEAD="#fe0000"

if pgrep -f "$PROCESS_NAME" >/dev/null 2>&1; then
  echo "ρ| size=$FONT_SIZE color=$FONT_COLOR_ALIVE"
else
  echo "χ| size=$FONT_SIZE color=$FONT_COLOR_DEAD"
fi
2. Place ClamavSentry.10m.sh in $HOME/Documents/SwiftBar/
$HOME/Documents/SwiftBar/ClamavSentry.10m.sh
"Menu bar Icons that shows the processes of ClamavSentry"

- ClamAV: The GIT Repository of ClamAV®
- ClamAV®: Clam AntiVirus - An open source anti-virus engine
- ClamAV® blog: A blog of ClamAV®: Clam AntiVirus
- fswatch: A file change monitor
- fswatch - Man Page
- SwiftBar: Powerful macOS menu bar customization tool
- Creating SwiftBar plugins guide
- xbar: Put anything in your macOS menu bar
- Writing xbar plugins guide
- How to build ClamAV® using the CMake Build System on macOS
- Building ClamAV® on Mac OS X 10.4 through macOS 27.x Golden Gate
- How to install ClamAV® from the Git sources on macOS
- How to install ImageMagick® from source on OS X 10.11 El Capitan through macOS 27.x Golden Gate
- How to customize Firefox and make it simple and elegant on macOS
- Camino - Mozilla power, Mac style
- Camino : Private Build - Graphite Style & Optimized for i686
- Camino : Private Build - Monochrome Graphite Camino
- Making Safari 4 Unified Appearance
